Want to give your plants a jumpstart? Well, let me tell you, it’s like having a secret weapon in the universe of gardening. Check out the benefits of incorporating this efficient gardening technique…

- How to Start Seeds Step-by-Step
- What Type of Seeds Can You Cultivate in a Small Greenhouse?
- How to Maintain the Right Temperature & Humidity
- What Equipment/Supplies Do You Need
- Natural Sunlight VS Grow Lights
- Best Time to Start Seeds in a Greenhouse
- How Long Before Transplanting
How to Propagate Seeds Step-by-Step:
- Gather Supplies: Collect mini greenhouse or trays, potting soil, seeds, watering can, labels, and a thermometer/hygrometer if available.
- Prepare Mini Greenhouse: Ensure cleanliness and sanitize if necessary.
- Select Seeds: Choose seeds based on your desired plants, following packet instructions.
- Fill Trays: Use well-draining, sterile potting mix to fill seed trays.
- Plant Seeds: Follow seed-specific depth and spacing guidelines, placing seeds in prepared holes.
- Label Trays: Tag trays with plant names and planting date.
- Provide Moisture: Gently water for even moisture, avoiding waterlogging. A spray bottle can help.
- Cover: Place trays in the mini greenhouse, using a transparent lid if available for controlled conditions.
- Monitor Conditions: Use a thermometer to maintain optimal germination temperature. Maintain humidity with misting or a humidity tray.
- Provide Light: Depending on natural light, supplement with grow lights for 12-16 hours daily.
- Ventilation: Open vents periodically to prevent mold and disease.
- Transplant: Move seedlings to larger pots or outdoor garden when they have strong growth and true leaves.
- Harden Off: Gradually expose seedlings to outdoor conditions before transplanting. Start with short periods, increasing exposure.
What Type of Seeds Can You Cultivate in a Small Greenhouse?

You can propagate all sorts of seeds in a mini greenhouse, making it a versatile tool for jumpstarting your garden.For example, types of seeds you can start in a mini greenhouse include annual and perennial flowers, vegetables and herbs.
Plus, you can grow fruit, native trees, plants and shrubs, cool-season crops, tropical plants and even exotic or rare plants.
How to Maintain the Right Temperature & Humidity for Starting Seeds:
Temperature Control: Invest in a suitable heating source for your mini greenhouse, such as electric heaters, heating mats or heat lamps, chosen according to greenhouse size. Use a thermostat to maintain the temperature within the recommended range, typically 70°F to 85°F (21°C to 29°C), adjusting as needed for specific plants. Ensure ventilation by utilizing adjustable vents or windows to prevent overheating.

Humidity Management: Maintain humidity for your seedlings with these practices:
- Regularly mist the soil to keep it moist, raising humidity levels.
- Place a shallow tray with water and gravel near seedlings for added moisture.
- Cover seed trays with clear plastic lids or wrap to create a mini greenhouse effect.
- Use a hygrometer for precise humidity monitoring.
Positioning for Optimal Growth: Select a suitable location for your mini greenhouse, ensuring it receives the right amount of indirect sunlight or use grow lights for consistent temperature and humidity. Positioning under lights can aid in maintaining stability.
Watering Technique: Practice bottom watering for seedlings in trays by placing them in water until the soil absorbs moisture, preventing surface disruption and humidity fluctuations.
Cooling Strategies: To combat overheating, consider using external shade cloth to reduce direct sunlight and heat absorption.
Regular Monitoring: Make frequent checks of temperature and humidity, adjusting heating and ventilation as needed to maintain ideal conditions. Research specific requirements for different plant species.
In summary, meticulous temperature and humidity management in your mini greenhouse creates a nurturing environment where seeds thrive, ensuring a strong start for your garden.
What Equipment/Supplies Do You Need to Start Seeds in a Greenhouse?
Seed Trays or Containers: Yes, you’ll need something to plant those precious seeds in, unless you enjoy a soil mess on your hands.
Potting Mix: Ordinary garden soil just won’t cut it. Get a high-quality potting mix for your delicate seedlings. They deserve the best.
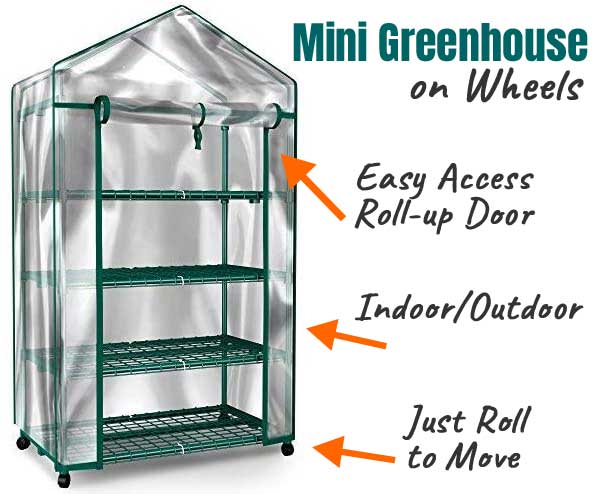
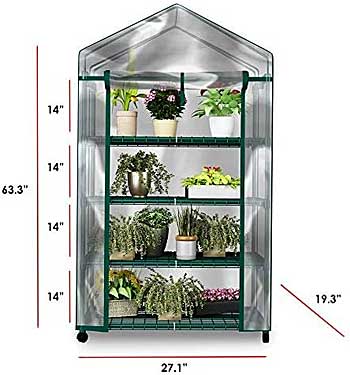
Mini Greenhouse: Well, this one’s a no-brainer. A mini greenhouse is your stage, your sanctuary, your secret weapon for seed success.
Heating Source: Unless you want your seeds to shiver in the cold, invest in a heating source like mats or heaters to maintain that cozy temperature.
Thermostat: It’s not rocket science, but a thermostat will help you avoid a heat attack or a freeze-over on your future greenery.
Grow Lights: Unless your mini greenhouse sits in the Garden of Eden, you’ll probably need some artificial sunlight to keep those sprouts reaching for the sky.

Hygrometer: A fancy name for a humidity tracker. Seedlings appreciate a stable environment, and you’ll know when to mist or not.
And a few more materials you may need…
Transparent Lids or Plastic Wrap: Seedlings love a little greenhouse within the mini greenhouse – keeps them cozy and humid.
Spray Bottle: For that daily misting ritual. Makes you feel like a plant whisperer, right?
Labels: So you don’t play the guessing game later. Know which baby plant is which.
Watering Can: Precise watering is an art form. And, yes, a watering can is your paintbrush.
Shade Cloth: In case your mini greenhouse starts feeling like a tropical sauna, a shade cloth can be your savior.
Ventilation System: Because even baby plants need fresh air. Install vents or open up during the day to keep things breezy.
Trays or Mats for Bottom Watering: Let’s be classy. Bottom watering prevents soil disturbances and maintains humidity.
Patience: The most essential supply of all. Seedlings don’t grow overnight; they take time and care.
Using Natural Sunlight VS Grow Lights for Seedlings:
You can use natural sunlight or grow lights for seedlings, but the choice depends on your specific circumstances and the quality of light available. Here’s a breakdown to help you decide:
Natural Sunlight:
Pros:
- Cost-effective: It’s free! Utilizing natural sunlight doesn’t add to your energy bills.
- Full Spectrum: Sunlight provides a full spectrum of light, which is beneficial for overall plant growth.
- Natural Rhythms: Plants respond well to the natural day-night cycle, promoting healthy growth.

Cons:
- Location-Dependent: Your ability to use natural sunlight depends on your geographic location, climate, and available sunlight hours.
- Inconsistent: Natural sunlight can be inconsistent in terms of intensity and duration, especially during cloudy or overcast days.
- Space Limitations: You may need to rearrange seedlings frequently to ensure they receive adequate light.
Grow Lights:
Pros:
- Control: Grow lights offer precise control over light intensity, duration, and spectrum, allowing you to tailor conditions to your seedlings’ needs.
- Consistency: They provide consistent light regardless of weather or season, ensuring reliable growth.
- Year-Round Use: Ideal for year-round gardening, allowing you to start seeds at any time.
Indoor Gardening: Suitable for indoor gardening when natural sunlight isn’t readily available.
Cons:
- Cost: Initial setup can be expensive, and electricity costs are incurred over time.
- Learning Curve: Some knowledge is needed to select the right type of grow light and configure it properly.
- Space Requirements: You’ll need space for the lights and may need to adjust their height as seedlings grow.
In summary, both natural sunlight and grow lights have their advantages and disadvantages. If you have access to consistent, quality natural sunlight and are willing to accommodate its limitations, it can work well for seedlings.
On the other hand, grow lights offer more control and flexibility, which can be extra convenient for indoor gardening or when natural light is insufficient.

Summary:
In general, for many common garden vegetables and annual flowers, you can start hardening off your seedlings when they have two sets of true leaves and outdoor conditions are suitable.
Transplant them into the garden a week or two after starting the hardening-off process. However, be sure to adjust the timing based on the factors mentioned above to ensure a successful transition for your seedlings from the mini greenhouse to the garden.
Last Updated April 23, 2024